Showing posts with label sunflowers. Show all posts
Showing posts with label sunflowers. Show all posts
Friday, November 13, 2009
Friday, October 2, 2009
Countdown: Flower Friday
Well we have made it all the way to Friday morning! The day before the wedding and the day of the rehearsal. There was still SO much to do ... even after all the work we had been doing. My main focus was the DIY flowers. I had 160 sunflowers that we needed to arrange into a bouquet, 11 centerpieces (5 high and 6 low) and about a dozen mason jars.
I don't have a lot of pictures because I had my hands full of flowers. It was messy! Lots of water, cut off stems, bits of floral tape littered my mom's nice new kitchen. I helped with all the high centerpieces and I think they turned out beautifully.

I am not so sure what went wrong with the low centerpieces. The oasis we bought didn't seem to hold the flowers the way the styrofoam had during the trial mom and I did. They held up ok for the wedding, but it was definitely not as nice as the trial centerpiece had looked. In hind sight I wish I had just scrapped the idea of the low centerpiece and made them all taller. Oh well ... hindsight is 20/20 right?

What I did not get done on Friday was my bouquet. I really wish that I would have taken the time to get it done before the rehearsal. Time just slipped right thru my fingers. My mom and SIL ended up making it the morning of the wedding. They did a beautiful job, but mom hadn't seen me make the trial bouquet and my SIL never saw it at all. Looking at some of the pictures I can see the flaws, but I am positive nobody else did. I guess that is just part of my control freak nature. I wanted to do it all.

I don't have a lot of pictures because I had my hands full of flowers. It was messy! Lots of water, cut off stems, bits of floral tape littered my mom's nice new kitchen. I helped with all the high centerpieces and I think they turned out beautifully.

I am not so sure what went wrong with the low centerpieces. The oasis we bought didn't seem to hold the flowers the way the styrofoam had during the trial mom and I did. They held up ok for the wedding, but it was definitely not as nice as the trial centerpiece had looked. In hind sight I wish I had just scrapped the idea of the low centerpiece and made them all taller. Oh well ... hindsight is 20/20 right?

What I did not get done on Friday was my bouquet. I really wish that I would have taken the time to get it done before the rehearsal. Time just slipped right thru my fingers. My mom and SIL ended up making it the morning of the wedding. They did a beautiful job, but mom hadn't seen me make the trial bouquet and my SIL never saw it at all. Looking at some of the pictures I can see the flaws, but I am positive nobody else did. I guess that is just part of my control freak nature. I wanted to do it all.

Labels:
blue,
centerpiece,
countdown,
DIY,
sunflowers
Friday, September 25, 2009
Countdown: Pedicures
Thursday morning before the wedding (T-minus 2 days!) I woke up, got the kids to school then went to meet my MOH and her mom at the Beauty School to get our pedicures. I wore my bright pink "Bride To Be" sash, since I didn't wear it for the Girl's Night Out.

Yes, we probably could have gone to a nicer more upscale salon, but
#1 - I was cutting my budget left & right so I didn't have the extra money
#2 - MOH and her mom have been going and like the students
Overall, my student did a great job on my pedicure. Unfortunately, they did not have the OPI Blue polish I wanted, so I had to pick a champagne color, I believe it is called fawn.

I asked my student for a flower, so she brought over the little jewels. I spotted yellow and blue, so I had her make a yellow flower with a blue center.

Doesn't it look like a sunflower?

Yes, we probably could have gone to a nicer more upscale salon, but
#1 - I was cutting my budget left & right so I didn't have the extra money
#2 - MOH and her mom have been going and like the students
Overall, my student did a great job on my pedicure. Unfortunately, they did not have the OPI Blue polish I wanted, so I had to pick a champagne color, I believe it is called fawn.

I asked my student for a flower, so she brought over the little jewels. I spotted yellow and blue, so I had her make a yellow flower with a blue center.

Doesn't it look like a sunflower?
Labels:
countdown,
MOH,
sunflowers
Wednesday, September 23, 2009
Countdown: Folding and Flowers
Wednesday (T-Minus 3 days) was 9/9/09 ... this was the day we had originally planned to be married. That is what was in the back of my head ALL DAY LONG. I could not dwell on that little tidbit of nostalgia of what could have been ... I had work to do.
Folding
That morning the napkins were delivered by the uniform company we already have an account with. I only paid 17 cents a napkin!!! If there is a local uniform company in your town give them a call. They had all the same colors that the party rental place have for a quarter of the price. It was a great deal.
Now that I had 120 napkins in my office I needed to start folding them. I had already sent off my 4x6 Flickr card to Walgreen's and had 120 printed for 10cents each. I could have made smaller ones and done them cheaper, but I wanted them to be seen and not lost on the tables.
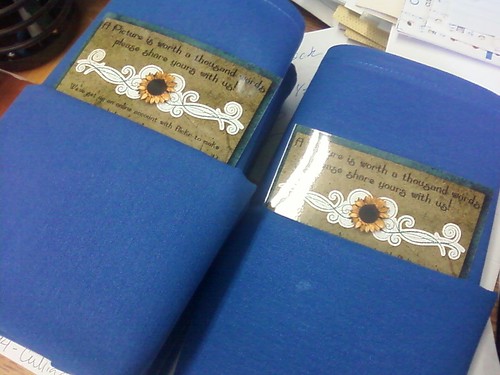
The 4x6 worked perfectly when I did the pocket fold as well. I worked all day at the office during the down time between phone calls and customers. By the end of the day all 120 had been folded and packaged into stacks of 10 and boxed up. Here are the napkins with the flickr card peaking out before I packaged and boxed them.
Flowers
Today was the day we had also arranged for FiftyFlowers.com to deliver the sunflowers for the centerpieces and my bouquet. I had went ahead and purchased 160, knowing that I could use the extras as fill in decor about the house and yard.
Unfortunately the problems started right away. My mom was set to be at the house all day Wednesday to wait for them. Then we got a call that she would need to drive and pick up a guest at the airport ... in San Diego (which is about a 6 hours drive round trip)
I called FiftyFlowers first thing in the morning, which is 8:00am for me. The tracking numbers I had been given were coming up invalid on the FedEx website. The customer service rep that I spoke too told me that she would look into it and get back to me. I wait about an hour or so before I tried calling back. This time I could not speak to a live person. I left a message that I stated was urgent, left my contact number and wait some more. At about 11:30 I emailed with "Urgent" in the subject line. An hour later I got a response. I was told that the tracking numbers were for a company called Ontrac (has anyone else heard of them? I had not) and that they would be there by 5pm. I replied back asking for more information, and did not receive a returned email. Luckily my mom got back to town earlier than expected and was at the house before the delivery driver arrived.
Folding
That morning the napkins were delivered by the uniform company we already have an account with. I only paid 17 cents a napkin!!! If there is a local uniform company in your town give them a call. They had all the same colors that the party rental place have for a quarter of the price. It was a great deal.
Now that I had 120 napkins in my office I needed to start folding them. I had already sent off my 4x6 Flickr card to Walgreen's and had 120 printed for 10cents each. I could have made smaller ones and done them cheaper, but I wanted them to be seen and not lost on the tables.
The 4x6 worked perfectly when I did the pocket fold as well. I worked all day at the office during the down time between phone calls and customers. By the end of the day all 120 had been folded and packaged into stacks of 10 and boxed up. Here are the napkins with the flickr card peaking out before I packaged and boxed them.

Flowers
Today was the day we had also arranged for FiftyFlowers.com to deliver the sunflowers for the centerpieces and my bouquet. I had went ahead and purchased 160, knowing that I could use the extras as fill in decor about the house and yard.
Unfortunately the problems started right away. My mom was set to be at the house all day Wednesday to wait for them. Then we got a call that she would need to drive and pick up a guest at the airport ... in San Diego (which is about a 6 hours drive round trip)
I called FiftyFlowers first thing in the morning, which is 8:00am for me. The tracking numbers I had been given were coming up invalid on the FedEx website. The customer service rep that I spoke too told me that she would look into it and get back to me. I wait about an hour or so before I tried calling back. This time I could not speak to a live person. I left a message that I stated was urgent, left my contact number and wait some more. At about 11:30 I emailed with "Urgent" in the subject line. An hour later I got a response. I was told that the tracking numbers were for a company called Ontrac (has anyone else heard of them? I had not) and that they would be there by 5pm. I replied back asking for more information, and did not receive a returned email. Luckily my mom got back to town earlier than expected and was at the house before the delivery driver arrived.
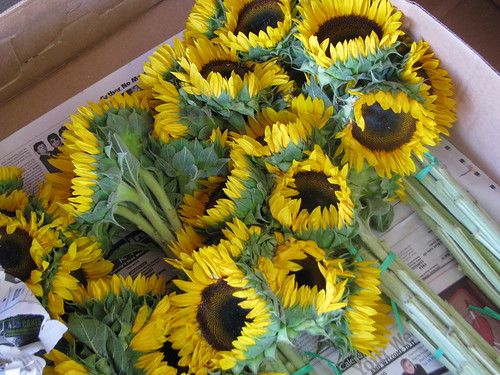
I arrived at the house at 4:55pm to see the delivery van leaving the house. The 2 large boxes looked man-handled and were slightly crushed. Upon opening the boxes I was very worried about my sunflowers. They looked very sad crammed into the boxes. Many head were bent over and were crushed from being smashed against other flowers in the box, some were even losing their petals. Take a look for yourself:



I followed the directions and filled up our 5 gallon buckets with fresh Reverse Osmosis (filtered) water and began cutting the stems of all 160 flowers. Because they looked so sad we cut about 6-8 inches off each sunflower to be safe.

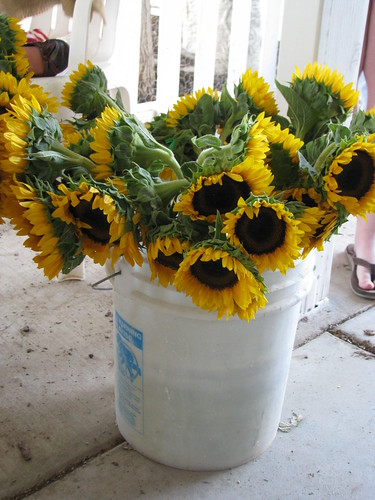


I had been told that the flowers would perk up and hydrate so I did not contact customer service (but I should have). I left the flowers soaking in a room with sunlight and air conditioning until Friday. This saga will be continued! LOL


I had been told that the flowers would perk up and hydrate so I did not contact customer service (but I should have). I left the flowers soaking in a room with sunlight and air conditioning until Friday. This saga will be continued! LOL
Labels:
DIY,
sunflowers,
tableware
Made By Mom: The DIY Ceremony Arch
Even though I was content to just stand on the deck and get married, my mom (knowing better) decided we needed some kind of arch. We had previously tried ordering one online that my mom liked, but shipping was more than the price of the arch. We went to the local rental company and the only one we kind of liked was still $50 just to rent. My mom came up with a plan while at Lowes ... She would MAKE one. Yes, we had a DIY (by Mom) arch for our ceremony.
You already saw the silk/dry floral arrangement that mom made.

Here is how she made the arch for the arrangement to go on.
supplies:
3 - sections of wood trellis from Lowes $12.50 each
white spray paint $4.50 each
Dad's nail gun
heavy gauge wire
Instructions:
Using the spray paint she coated all sides of all 3 panels. I believe 1 can was more than enough to complete the task.
She took the arrangement that she made and using heavy gauge wire attached it to one section of trellis across the front. That became to top of the "arch"
Next Dad stepped in with the nail gun. He set the top portion on the deck and arranged the two sides while it was laying down. The nature of the pattern in the trellis made it easy to get the sides even. He put a few nails in at the top to secure it. We then lifted the arch into place on the deck.
After a few minor adjustments to make sure it was even in the corner, he put a few nails in to hold the arch against the railing and then a few at the bottom to hold it down on the deck.
This is how the arch looks in place. The little white table is where the vases for the sand ceremony will be.

You already saw the silk/dry floral arrangement that mom made.

Here is how she made the arch for the arrangement to go on.
supplies:
3 - sections of wood trellis from Lowes $12.50 each
white spray paint $4.50 each
Dad's nail gun
heavy gauge wire
Instructions:
Using the spray paint she coated all sides of all 3 panels. I believe 1 can was more than enough to complete the task.
She took the arrangement that she made and using heavy gauge wire attached it to one section of trellis across the front. That became to top of the "arch"
Next Dad stepped in with the nail gun. He set the top portion on the deck and arranged the two sides while it was laying down. The nature of the pattern in the trellis made it easy to get the sides even. He put a few nails in at the top to secure it. We then lifted the arch into place on the deck.
After a few minor adjustments to make sure it was even in the corner, he put a few nails in to hold the arch against the railing and then a few at the bottom to hold it down on the deck.
This is how the arch looks in place. The little white table is where the vases for the sand ceremony will be.

Labels:
ceremony,
DIY,
MOB,
sunflowers
Wednesday, August 26, 2009
Made by Mom: Decor
Have I mentioned my crafty mom? Here are a few more decor projects she put together.
The silk/dried floral arrangement for the top of the trellis/arch thing that is being built.

A topiary (a second is in the works) they will probably be put on the food table.

The first round of ivy for the inside of the tents. There will be LOTS more of this to come.

The silk/dried floral arrangement for the top of the trellis/arch thing that is being built.

A topiary (a second is in the works) they will probably be put on the food table.

The first round of ivy for the inside of the tents. There will be LOTS more of this to come.

Labels:
DIY,
MOB,
sunflowers
Thursday, August 6, 2009
Invitations: The final reveal
Our guests should be recieving their invitations today or tomorrow, so here they (finally) are in all there glory!
I made custom vellum address wrap around labels, you can see the fronts in the box:

and the back side:
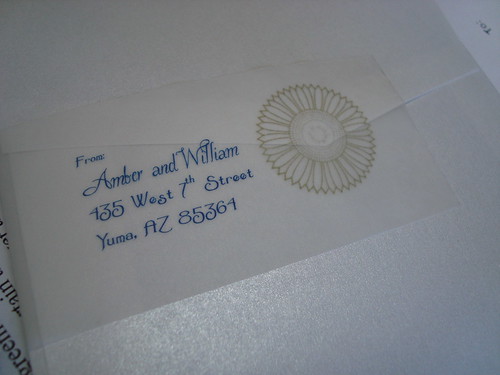
When our guests open the outside envelope they will see a beautiful ribbon tied invite (that I failed to take a picture of)

The beautiful blue pocketfold opens up to the invitation suite:

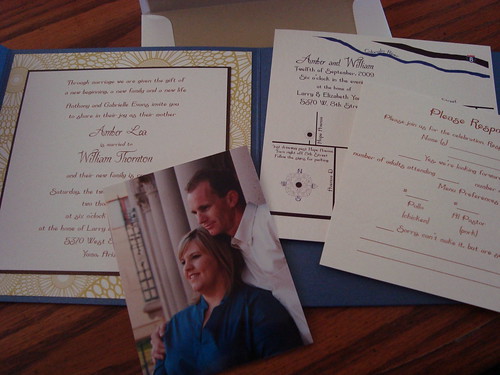
Some close ups:
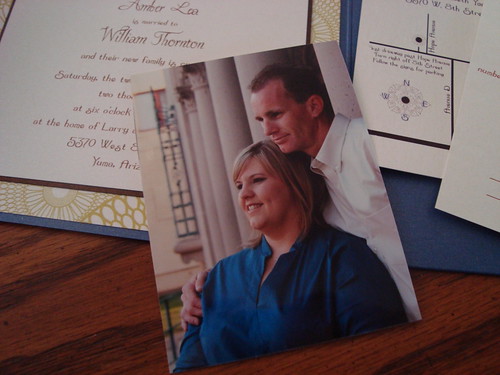
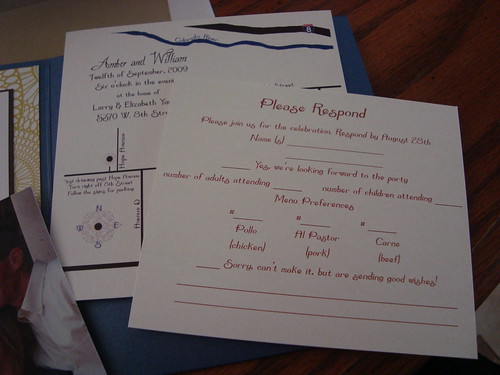
I love the wording I decided on:

The post office said it would be 81 cents postage so we rounded up and put either 2 sunflowers stamps (42 cents) or 2 king/queen stamps (standard 1st class)
I made custom vellum address wrap around labels, you can see the fronts in the box:

and the back side:

When our guests open the outside envelope they will see a beautiful ribbon tied invite (that I failed to take a picture of)

The beautiful blue pocketfold opens up to the invitation suite:


Some close ups:


I love the wording I decided on:

The post office said it would be 81 cents postage so we rounded up and put either 2 sunflowers stamps (42 cents) or 2 king/queen stamps (standard 1st class)
Labels:
blue,
DIY,
friendor,
invitations,
sunflowers
Tuesday, July 28, 2009
Made by Mom: Hair Wreath
There are some projects that I just don't have the time to get done, so instead I give my ideas to my mom and she runs with them and does the DIY for me (love you mom!)
I had this photo in my inspiration folder for how I wanted Miss G's wreath. My mom used it to create an adorable wreath.
She started with a small grapevine wreath. She softened the grapevines by letting them soak in the sink for a few hours until she was able to unravel the wreath. The one 99 cent wreath that she bought actually made 2 wreaths.

We then had Miss G try them on to see which fit her best.


Then my mom took the left over sunflowers from the pomander and arranged them and hot glued them around the wreath. This picture was taken with the ribbon wrapped around the wreath, but we decided to take that part off.

Miss G will be back on Sunday so she will get to try the finished product on then.
Do you have anyone helping with your "DIY" projects?


I had this photo in my inspiration folder for how I wanted Miss G's wreath. My mom used it to create an adorable wreath.
She started with a small grapevine wreath. She softened the grapevines by letting them soak in the sink for a few hours until she was able to unravel the wreath. The one 99 cent wreath that she bought actually made 2 wreaths.

We then had Miss G try them on to see which fit her best.


Then my mom took the left over sunflowers from the pomander and arranged them and hot glued them around the wreath. This picture was taken with the ribbon wrapped around the wreath, but we decided to take that part off.

Miss G will be back on Sunday so she will get to try the finished product on then.
Do you have anyone helping with your "DIY" projects?


Labels:
DIY,
MOB,
sunflowers,
the kids
Sunflower Trials
After my successful trip to the dollar store where I found my vases I went on a search for sunflowers. I went to every grocery store in town: Albertson's, Wal-Mart, Fry's, Sam's Club ... nobody had ANY sunflowers. I was so frustrated I almost called the local florists in town Monday morning. It is a good thing I got busy and procrastinated making that call because on Thursday dear sweet Mr. B called to tell me that Fry's had sunflowers for $3.99 for 5 on sale.
After work I made a bee-line across town to the Fry's and walked out with my arms full of sunflowers. I grabbed 4 bundles of the best sunflowers for a grand total of $17. Not too shabby at all, especially since this was just a practice run. I gave mom and ring and headed over to her house to play.
So ... what did I make with my 20 sunflowers??
One short centerpiece

One tall centerpiece

and a bouquet

Here are the centerpieces side by side

I got the vases at the Dollar Store, mom got theses beads at Wal-Mart, but for the rest of the centerpieces I am going to pick up the ones at the Dollar Store. For the small centerpiece I also need to pick up real oasis because the styrofoam we used didn't hold water. I estimate that each centerpiece will cost me about $10 when I figure in the cost of the flowers. The tall centerpiece took 5 flowers and the small centerpiece is 7 (but I think 8 will look better).
After some cost comparring and calling around we are going to order the sunflowers from FiftyFlowers.com their sunflowers are $129.99 for 100 and they offer free shipping. I also found a 5% off code (BRIDE) so that takes off an additional $6.50. We will need about half for the centerpieces and then I will make my bouquet. The rest will be used on the (cup)cake table, the guest book table, around the food buffet and the bar.
I am glad that we did this trial because I was originally anticipating needing more flowers. I was trying to convince mom that we needed to order the 160 or the 200 quanity lots. Did you find that your trial run helped save you money?
After work I made a bee-line across town to the Fry's and walked out with my arms full of sunflowers. I grabbed 4 bundles of the best sunflowers for a grand total of $17. Not too shabby at all, especially since this was just a practice run. I gave mom and ring and headed over to her house to play.
So ... what did I make with my 20 sunflowers??
One short centerpiece

One tall centerpiece

and a bouquet

Here are the centerpieces side by side

I got the vases at the Dollar Store, mom got theses beads at Wal-Mart, but for the rest of the centerpieces I am going to pick up the ones at the Dollar Store. For the small centerpiece I also need to pick up real oasis because the styrofoam we used didn't hold water. I estimate that each centerpiece will cost me about $10 when I figure in the cost of the flowers. The tall centerpiece took 5 flowers and the small centerpiece is 7 (but I think 8 will look better).
After some cost comparring and calling around we are going to order the sunflowers from FiftyFlowers.com their sunflowers are $129.99 for 100 and they offer free shipping. I also found a 5% off code (BRIDE) so that takes off an additional $6.50. We will need about half for the centerpieces and then I will make my bouquet. The rest will be used on the (cup)cake table, the guest book table, around the food buffet and the bar.
I am glad that we did this trial because I was originally anticipating needing more flowers. I was trying to convince mom that we needed to order the 160 or the 200 quanity lots. Did you find that your trial run helped save you money?
Labels:
bouquet,
centerpiece,
DIY,
sunflowers
Wednesday, July 1, 2009
DIY: Pomander - Part 2
I last left off the DIY Pomander with the flowers drying.
As I was gluing the sunflowers into the ball I noticed that I had a few small "bare spots." Not too many really, and probably only noticeable to me LOL. I thought of an idea to try and add more blue and camouflage those spots though.
I had purchased the thinnest blue ribbon to use in my daughter's floral fairy wreath (tutorial to come!). I made 3 nice sized loops with an 6-8" piece of ribbon and poked a pin thru all the layers like this:

Then I coated the pin with my glue and carefully stuck it into one of the spaces between the flowers.

I randomly added these around the ball, just using my eye to space them evenly apart. Not too many, just enough to give the splash of blue color with the sunflowers.
Once all my sunflowers were securely glued in place I was able to take the next step ... the ribbon handle. I was fully prepared to figure it out by trial & error, when I saw Miss Mascara's tutorial on Weddingbee. She didn't provide pictures so I still had to figure a little bit out, but I DID take pictures to show you. The following is an excerpt of Miss Mascara's instructions (posted with permission) with my pictures & commentary .
Cut a slit in the bare spot of the ball to attach the ribbon. Make sure the slit is as wide as your ribbon width so it fits properly. I used my scissors and kind of cut/carved my slit
Fold your ribbon in half. Measure the desired length of your wrist strap from the folded end (mine is about 6″). Mark this spot. I used a straight pin to mark my spot and made my handle slightly longer
Fill the slit with hot glue. Used my tacky glue just like I did with the flowers.
Place the marked portion of your ribbon into the slit on the ball. Do not put the folded end or the two open ends into the slit, only your wrist strap marks. You are basically just gluing in a little fold at that mark to hold the ribbon in place. I used my scissors to really push it down into the styrofoam.


For good measure, stick a few straight pins in on an angle to make sure the ribbon doesn’t fall out if the pomander is whipped around (it is for a little girl to carry after all, this will probably happen). I used 4-5 pins going straight down into the slit and then about 3 on each side going in at an angle
After the glue is dry, take your two open ribbon ends and tie a bow with the folded wriststrap coming out of the top of the bow.

Trim the ends of the ribbon as desired. I folded the ends of the ribbon in half and cut on an angle to create an inverted V. I need to seal the ends with a little clear nailpolish so the ribbon doesn't fray.

Have you found any useful tutorials on Weddingbee?
As I was gluing the sunflowers into the ball I noticed that I had a few small "bare spots." Not too many really, and probably only noticeable to me LOL. I thought of an idea to try and add more blue and camouflage those spots though.
I had purchased the thinnest blue ribbon to use in my daughter's floral fairy wreath (tutorial to come!). I made 3 nice sized loops with an 6-8" piece of ribbon and poked a pin thru all the layers like this:

Then I coated the pin with my glue and carefully stuck it into one of the spaces between the flowers.

I randomly added these around the ball, just using my eye to space them evenly apart. Not too many, just enough to give the splash of blue color with the sunflowers.
Once all my sunflowers were securely glued in place I was able to take the next step ... the ribbon handle. I was fully prepared to figure it out by trial & error, when I saw Miss Mascara's tutorial on Weddingbee. She didn't provide pictures so I still had to figure a little bit out, but I DID take pictures to show you. The following is an excerpt of Miss Mascara's instructions (posted with permission) with my pictures & commentary .
Cut a slit in the bare spot of the ball to attach the ribbon. Make sure the slit is as wide as your ribbon width so it fits properly. I used my scissors and kind of cut/carved my slit
Fold your ribbon in half. Measure the desired length of your wrist strap from the folded end (mine is about 6″). Mark this spot. I used a straight pin to mark my spot and made my handle slightly longer
Fill the slit with hot glue. Used my tacky glue just like I did with the flowers.
Place the marked portion of your ribbon into the slit on the ball. Do not put the folded end or the two open ends into the slit, only your wrist strap marks. You are basically just gluing in a little fold at that mark to hold the ribbon in place. I used my scissors to really push it down into the styrofoam.


For good measure, stick a few straight pins in on an angle to make sure the ribbon doesn’t fall out if the pomander is whipped around (it is for a little girl to carry after all, this will probably happen). I used 4-5 pins going straight down into the slit and then about 3 on each side going in at an angle
After the glue is dry, take your two open ribbon ends and tie a bow with the folded wriststrap coming out of the top of the bow.

Trim the ends of the ribbon as desired. I folded the ends of the ribbon in half and cut on an angle to create an inverted V. I need to seal the ends with a little clear nailpolish so the ribbon doesn't fray.

Have you found any useful tutorials on Weddingbee?
Labels:
DIY,
sunflowers,
the kids
Subscribe to:
Posts (Atom)

