Pulling together a co-ed baby shower is challenging! Add to that a BaByQ/Rock Star theme and we have our work cut out for us to stay on budget. Here are some of our ideas in the works with some money saving DIY tips for throwing a co-ed baby shower.
The invitations:
Like all of our past parties we save money by designing and printing our own invitations. Amber really has a gift for creating some awesome invites and this one will surely challenge her!The inspiration for the invitation will be a combination of this invite from The DIY Showoff. We loved her original BaByQ shower and pulled a few ideas from her fantastic baby shower to use at ours.

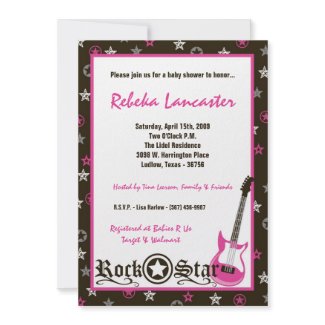
Since we are adding in the Rockabilly/Rock Star theme to our baby shower I also found this invitation on Zazzle that is almost our color scheme as well.
 The invitation will include some of the following wording:
Maddie will Rock Their World. Come celebrate with us at a BaBy-Q for the parents to be.
Bring your swimsuits and prepare to splash and have fun!
Decor:
For our placemats we already went to the second hand shop (Goodwill actually). Every other Saturday they have a 50% off sale (did you know that? It is a great money saver on top of low prices) and we were able to pick up vinyl record albums for .50 each. Amber will make a new party label for the albums to match the decor. Since we plan on using round tables and don't want the table to look too crowded, we will opt to use one album at every other place setting. Guest will be allowed to take home the albums if they choose.

In addition I have also been busy DIY tissue paper poms to hang from the ceiling inside. It had been years since I had made them, but it came back to me quickly. The poms are all the rage in decor right now and they are so inexpensive, and give a great splash of color to the room. The package of 20 pieces of tissue paper that I bought made 4 poms total: 2 large, 1 medium and 1 small. I will grab another pack or two of paper to have a nice variety of sizes and shades of pink.

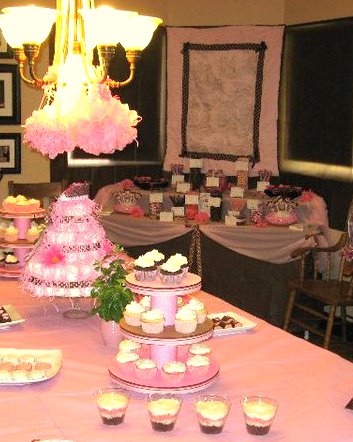
Candy Buffet:Of course we also are planning to have a Candy Buffet and maybe even a Cake Buffet. Again a trip to the second hand shop and we bought all our containers for less then $10.00! This was a HUGE savings over buying them brand new at Joann's or Michael's where they are typically $10-$15 each. I will use the Mother to Be's nursery bedding for the back drop. It is not only perfect for the decor, but she will get to take it home with her! We have a list of the Mom to be’s favorite candies and have been on the look out for the most pink options possible. Here are some of the pink and brown candy buffets we have been inspired by for the set up:


Food & Drinks:It is a BaByQ after all, so our menu will consist of BBQ pork ribs and chicken kabobs for the adults with hamburgers and hotdogs for the kids. Along with traditional sides like corn on the cob, baked beans and a pasta salad. This is menu that is easy to prepare and can stretch your food budget while also giving guests a variety of food to eat. No co-ed party is complete without a few adult refreshments. To keep costs low and on budget we plan to have 2 signature drinks. The alcoholic cocktail will be Strawberry Margaritas and we will give it a fun name (any suggestions?). For the non-alcoholic signature drink We will have pink punch or pink lemonade. I also found RockStar beverages. My hubby wondered if we really wanted to serve energy drinks, but I can't resist that the cans fit our theme! I have been watching the grocery store sales to get a good price on them.


Outside Decor:Outdoor decor always has special considerations to take into account. We never know when the wind will kick up or even if a slight drizzle will occur during Monsoon season. To take that into account I have become a pro at using the Dollar Store plastic tablecloths to my advantage. They are a great low cost way of adding color, hiding unmentionables and transforming a room for the cost of a few dollars. For the coed baby shower I plan on using pink and brown plastic tablecloths to make swags on the back patio fence, and to make a flags for the front by the driveway.
We will also be using some of the paper lanterns from Amber’s wedding around the edges of the outdoor area. Even if we don’t light them, they will add some interest to the areas around the house.
Games:We haven't narrowed down our games ideas but these are on our "possible" list:
"Bun In The Oven." Make felt dresses with a small slit cut into the back which allow a cotton ball to be inserted into the dress (looks like a baby bump!). Female Guests are asked to take one dress. When everyone has a dress, they pulled out the cotton ball looking for the "bun" (made from play dough and painted with white icing and glitter). The person who found the bun wins the prize.
 "Stroller Obstacle Course"
 Testing the new dad's ability to take care of a child while adding a fun twist. Place a baby doll in a stroller and set up obstacles for him to maneuver around. Time him on speed and his ability to keep the baby safe. Test other guests to see who is the fastest.
"Don't break the water!" This is an outdoor game that works great for a co-ed party! Start with an aluminum bucket full of water balloons. Guests need to hold the water balloon between their legs and run from one point to another without breaking their water.
The centerpieces will be taking on double duty to save money and will be the prizes for the games. They'll be numbered and winners from the game will draw a number to receive their prize.
BBQ Bibs:
I thought that since we are incorporating the BBQ theme and serving BBQ ribs that it would be a nice touch to have some plastic bibs. I am going to use the Dollar Store plastic tablecloths to cut out ones that will match the decor.

Only three more weeks till the big party weekend!